New Post

Rss

Friday, April 19, 2013
How to Speed Up µTorrent Downloading .

How to Speed Up µTorrent Downloading .

Many people often ask me why their downloads are slow. If there are plenty of seeds and peers, it shouldn't be. I'm no expert but I always get decent speeds so I've copied my settings.

If you don't already use µTorrent, download it. http://www.utorrent.com/

Once installed, you will get the option to do a speed test, do the test and save the settings.

Once you have saved them, open up 'Options' then 'Preferences'.

On the left of the screen you will see the list of pages you can access. I have included screen prints of each of the pages you need to change.

 
1 - General
Just copy the settings you see


2 - UI Settings
Just copy the settings you see


3 - Directories
Decide where you want to store your downloads. You may want to make some new folders. Once you have done that just set those folders in the boxes you see.


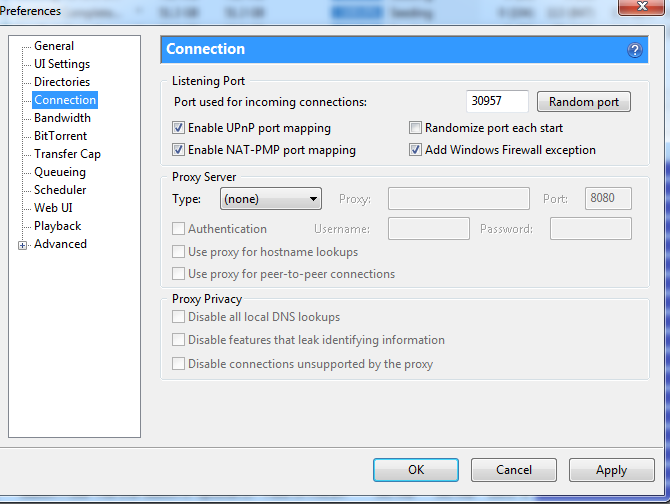
4 - Connection
Just copy the settings you see


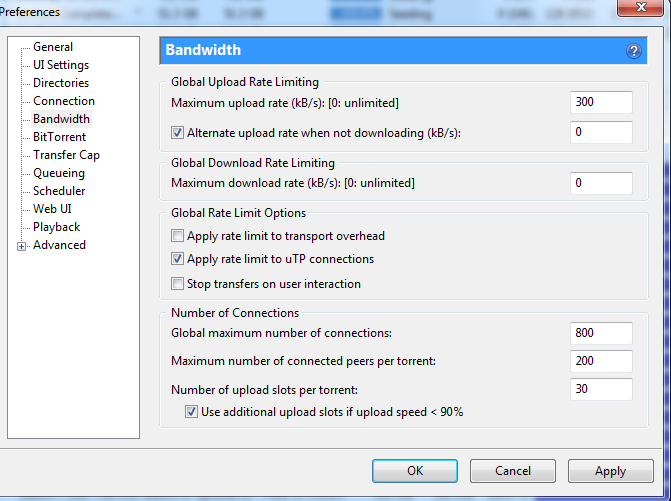
 5 - Bandwith
Important - leave the upload rate in the top box, do not change it. This has been determined with the speed test. Leave the first box alone. You will see it says 300 Kb/s, that's my own settings set by my utorrent, yours will probably be different.
The rest of the boxes you can change. You'll probably see I've set more connections than the speed test recommends, change it anyway, you can always change it back. More connections = more people to download from = faster downloads.


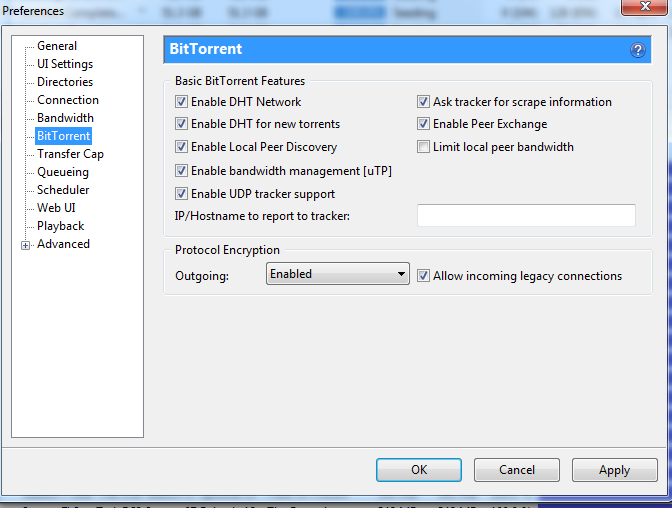
6 - Bit Torrent
Just copy the settings you see. The main one will be Protocol Encryption. Change this to 'Enabled'.


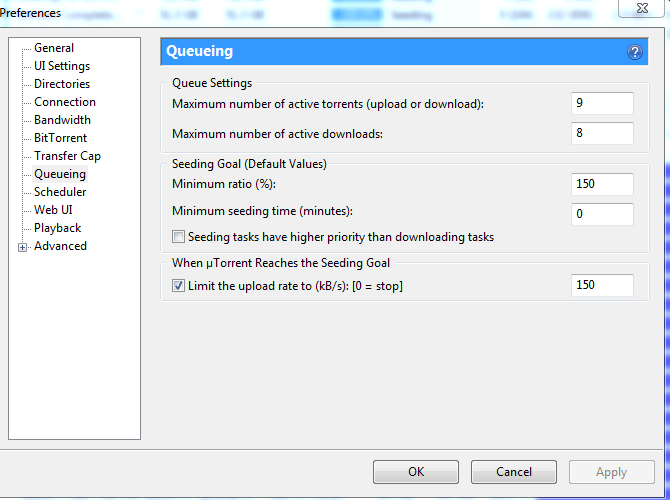
7 - Queueing
Just copy the settings you see.


8 - µTorrent Download Page
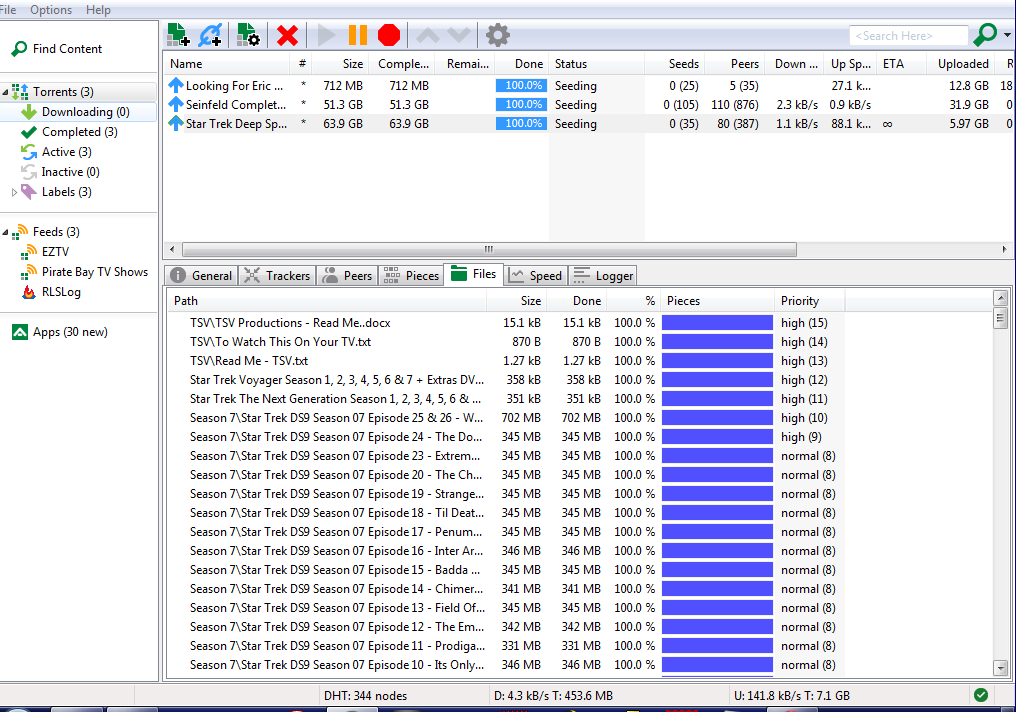
As you can see, about half way down the page you will see some tabs. If you click on 'files' you can prioritise the files so they get downloaded in the order you want. If you select "Do Not Download" it won't download it at all. Handy if you want to start watching the tv shows whilst it downloads and if you don't want to download everything in the torrent.


That should be everything but if you have any more questions click on this. http://www.utorrent.com/help

Enjoy,
no image

7 ways to increase Torrent Speed

increase torrent speedThe use of Bit Torrent is an efficient way to transfer files of just about any size quickly and efficiently. How this works is by breaking the huge files into smaller pieces and is from one or many of the different sources. This is one of the best ways to transfer bulky files quickly even when you are using a low bandwidth connection. There are many more things that you can do with Bit Torrent, but here we are going to discuss how to make this work much faster.


Here are some essential tips for the same,

    1,Start with your ISP:

All ISP has a preset maximum upload and download speed, and you cannot make your torrent work beyond this speed. All you can do is to use the best use of this upload and download speed even when the signal is weak. You can check the maximum speed that you can achieve by conducting a broadband speed test and compare with the DSLReports that comes with your uTorrent.

    2,Opt-In for healthy seeds and peers:

A peer is any computer participating           in downloading and uploading of torrent files along with that of yours. A seeder is one who has a complete copy of the file that is being shared across a torrent network. A leecher is the person who has joined the network recently and do not have most of the file that you or the peer has. This leecher becomes the seeder when they download the entire file and is able to share it across the network.  For getting high torrent speed, you need to increase the number of seeders to increase the chance of healthier and reception of higher speeds.

    3,Get through the firewall:

Many times, you will find the administrator or the firewall in your web browser is set to block and receive torrent files. The first thing that you need to do is to get appropriate permissions for downloading torrent files, and add this to your firewall, which will enhance the speed at which you can download torrent files. If the internet is through a router, then you have to set the torrent file to cross the barrier of the security of the router also.

    4,Go to a different port:

The default port for BitTorrent protocol is always between the numbers 6881-6999. This is because BitTorrent sharing will involve high bandwidth usage. However, this is possible that you can configure a different port for your torrent client and this has been best advised to set this number to somewhere around 10000.

    5,Limit your upload rate:

A peer to peer network is sharing alike on the same or similar platform and therefore you should be able to set your client’s upload speed rate to a maximum amount, which will usually be about 80 percent of your maximum upload speed that is being offered by your ISP. Keep this speed, as high as possible, but you have to play your cards well as the upload speed affects your download speed as well.

    6,Use your common sense:

If you understand the concept of how Bit Torrent works, then your common sense will automatically tell you that this is possible to view the individual files being downloaded and disable the ones that you are not in need off, which will  help you to speed up the process of downloading the files using Bit Torrent.

    7,Bandwidth and connections:

This is possible to set the maximum number of connections, maximum number of peers connected per torrent and number of slots per torrent so that you can decide on which numbers gives the maximum efficiency from your Bit Torrent files.
Now is that you have some tips on how to increase the speed of downloading while using Bit Torrent, why not try these tips out next time! Comments are appreciated!!
Thursday, April 18, 2013
How To Install HTML Parser Tool In Blog

How To Install HTML Parser Tool In Blog


Usually, if you want to parse html, you will go to  Blogcrowds, or the other. Now, I found a trick to install the tool in your blog. This trick will install the tool into your blog. Before I give the steps, i will show the result.


If you are inteterested, you just follow the steps

1. Log in to your blogger account
2. Go to Design>>>Page Elements>>>Add Gadget
3. Choose "HTM/Java Script"
4. Then, copy the code below and paste on it  

<script src="http://www.gmodules.com/ig/ifr?url=http://hosting.gmodules.com/ig/gadgets/file/102462998830435293579/post-Code.xml&amp;up_grows=10&amp;up_conv1=1&amp;up_conv2=1&amp;up_conv3=1&amp;up_conv4=1&amp;up_conv5=1&amp;synd=open&amp;w=320&amp;h=200&amp;title=Post-Code%3A+code+converter&amp;border=http%3A%2F%2Fwww.gmodules.com%2Fig%2Fimages%2F&amp;output=js"></script>

5. Finish? Save it 
Don't close first! I have important information! If you want to create your own, you can go here 

Display Html Code In Your Blog-Html Parse Tool

Display Html Code In Your Blog-Html Parse Tool

Beneath is an present html parse puppet.This can be old to exhibit html in your blog posts.Once you preserve html the parsed write leave be generated and that encrypt when intercalary to a aggregation module be displayed as cipher not biform.This way can also be utilized to parse AdSense cypher as it needs to be parsed before state additional to templates.


What Is This ?

 Html Character EnCoder tool can help you to display html codes to your posts and blogs comments.

 Example. If you posted this code
<body>
<p>Face Blog</p>
</body>
  the browser will convert it to Face Blog
 Face Blog 

But what if you want to display this code in your post in the same format, just paste it in the tool's text area and click convert and copy the converted code, then add it to your blog post, then your browser and visitors will see it exactly as you entered it.
Wednesday, April 17, 2013
How To Add Floating Social Media Buttons With Cool Hover Effect For Wordpress And Blogspot

How To Add Floating Social Media Buttons With Cool Hover Effect For Wordpress And Blogspot

Today  I comes with New Floating Interpersonal Media Buttons With Caller Vacillate Notion. You can add floating sociable media buttons to WordPress and Blogger. You may tally seen floating ethnic media buttons on other website and blogs but we try to engage you any unparalleled tool widget which you never seen anywhere. I prefabricated this into a cuneate widget so you don't pauperism to go into your example or motif maker honorable adhesive inscribe below to your journal.

Exclusive of advisable dimension of this is a waver impression. When you loom your steal the button comes with a precooled screen hesitate. I had included any most victimized multiethnic media sharing buttons like Google+, Facebook Like Buttons, Stumbleupon, Twitter and Digg. Apiece of them comes with a unfilmed tabulator.You can add more social bookmarking or sharing buttons subsequent if you compliments.

 How To Add Floating Social Media Buttons With Cool Hover Effect

You just need to place a code to your blog widget Follow following steps to add floating social media buttons to WordPress and Blogger.

Adding To Blogger

    1,Go to Design > Page Elements.
    2,Click Add A Gadget.
    3,In Add A Gadget window, select HTML/Javascript .
    4,Copy the code below and paste it inside the content box.
    5,Save the gadget.
    6,Drag the gadget and reposition it under Blog Posts gadget.
    7,Click Save button (top right hand corner).

Adding To WordPress

    1,Go to Dashboard > Appearance > Widgets > Available Widgets.
    2Drag Text widget into a sidebar.
    3Paste in the code.
    4Save.
<!-- floating share bar Start www.techmma.com-->
<style type="text/css">
.sbutton{
background:#f0f0f0;
cursor:pointer;
color:#fff;
border:none;
padding:4px;
text-shadow:0 -1px 1px rgba(0,0,0,0.25);
-moz-border-radius:6px;
-webkit-border-radius:6px;
border-radius:6px; margin-left:8px;
font:12px sans-serif;
}
.sbutton:hover{
background:#336699;
}
#pageshare {position:fixed; bottom:15%; margin-left:-81px; float:left; border-radius:5px;-moz-border-radius:5px;-webkit-border-radius:5px;background:#fff;border: 1px solid #f7f7f7; padding:0 0 2px 0;z-index:10;}
#pageshare .sbutton {float:left;clear:both;margin:5px 2px 0 5px;}
#pageshare:hover {-moz-border-radius:6px;
    -moz-box-shadow: 0 2px 4px hsla(0,0%,0%,.35);
    -webkit-box-shadow: 0 2px 4px hsla(0,0%,0%,.35);border: 1px solid #ddd;}
.fb_share_count_top {width:48px !important;}
.fb_share_count_top, .fb_share_count_inner {-moz-border-radius:3px;-webkit-border-radius:3px;}
.FBConnectButton_Small, .FBConnectButton_RTL_Small {width:49px !important; -moz-border-radius:3px;/*bs-fsmsb*/-webkit-border-radius:3px;}
.FBConnectButton_Small .FBConnectButton_Text {padding:2px 2px 3px !important;-moz-border-radius:3px;-webkit-border-radius:3px;font-size:8px;}
</style>
<div id='pageshare' title="Get this from bloggers-hero.blogspot.com">
<div class='sbutton' id='fb'>
<a name="fb_share" type="box_count" href="http://www.facebook.com/sharer.php">Share</a><script src="http://static.ak.fbcdn.net/connect.php/js/FB.Share" type="text/javascript"></script>
</div>

<div class='sbutton' id='su'>
<script src="http://www.stumbleupon.com/hostedbadge.php?s=5"></script>
</div>

<div class='sbutton' id='digg' style='margin-left:3px;width:48px'>
<script src='http://widgets.digg.com/buttons.js' type='text/javascript'></script>
<a></a>
</div>
<div class='sbutton' id='gplusone'>
<script type="text/javascript" src="https://apis.google.com/js/plusone.js"></script>
<g:plusone size="tall"></g:plusone>
</div>
<div class='sbutton' id='rt'>
<a class='twitter-share-button' data-count='vertical' href='https://twitter.com/share'>Tweet</a><script src='//platform.twitter.com/widgets.js' type='text/javascript'/></script></div><div style="clear: both;font-size: 9px;text-align:center;">Get <a href="http://techmma.com/">widget</a></div><!-- Do not remove this link -->
</div><!-- floating share bar End -->

Enjoy....
How To Make Windows 8 Look Like Windows 7 Two Ways

How To Make Windows 8 Look Like Windows 7 Two Ways

Ever Since Windows 8 has launched, users have faced difficulties in adopting the new UI. According to surveys, users want to use the new Windows 8 but without Windows 8 Tiles, and Start Screen, they want the new Windows 8 to look like Windows 7. This article is for those who don’t know much about command prompt and avoid hassles of following multiple instructions. So here I’ll show you How To Make Windows 8 Look Like Windows 7 in 2 Simplest Ways I found.

How To Make Windows 8 Look Like Windows 7

 
1. Download Classic Shell

Classic Shell is a free software which allows you to get Windows 7 or even Windows XP look-alike Start menu on your Windows 8, the greatest draw-back amongst users who are unable to adopt Windows 8 is the absence of Start menu, Classic Shell involves simple installation steps and implementation.

After you have downloaded, the download screen appears as follows :


After you have installed, the following window appears :


You have to open Start Menu Style tab and select WINDOWS 7 and click OK, after you click OK, you will get a whole lot of new customizable features, with which you can further customize your UI, the windows look-like:


As you can see, you can change the styling, general behavior, menu look and other features on this panel and click OK, after this you may get a warning , which you have to click YES so the Changes may be applied.

Your new Windows 8 menu will look-like this :


You may uninstall this program anytime to get back your Windows 8 original User Interface.


2. Vi-Start

This is again a free third-party application. After simple installation steps, this app will make your Windows desktop look-like Windows 7 with the exactly same start menu as you see in Windows 7.


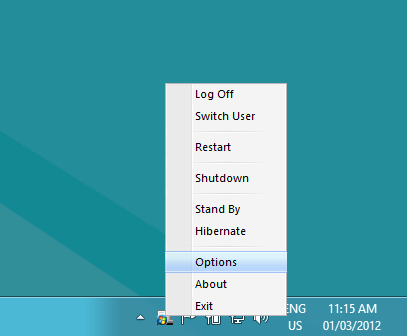
You can make changes in the application by moving cursor over to Tray icon and selecting OPTIONS for customization.


The OPTION menu will look-like this :


You can select options according to your needs as well as Put a check on Start with Windows so that it loads every time Windows Starts.
Tuesday, April 16, 2013
How to unlock the password protected memory card of your mobile phone.

How to unlock the password protected memory card of your mobile phone.

Requirement: You need a file explorer like FExplorer which you can download from here.
How to Unlock MMC card:
Method:

    1,Insert card into your phone but don’t access it through phone.
    2,Run FExplorer and Open the path C:\system.
    3,You will find a file called mmcstore ,rename the file mmcstore.txt
    4,Copy that file(mmcstore.txt) to your pc and open that file in notepad.
    5,You will find your password in that file... Enjoy
    Stay Connected ... !
Monday, April 15, 2013
3 Simple Ways to Disable USB Ports

3 Simple Ways to Disable USB Ports

Flash Drives are nowadays are the most common way to transfer data from one system to another
quickly. USB ports are like open doors to allow anyone to enter your system if it is turned on. But you can disable USB ports on your PC to stop intruders to infect your system with malicious data or to prevent someone to steal anything from your system. There are some common ways discussed below to completely disable USB ports on your Windows PC.

1. Disabling through BIOS

This one is the easiest to follow. At system boot up, BIOS contains all the hardware information and configuration options through which you can easily enable disable any hardware installed inside your system.

1. At system startup press DEL or F2 key to open BIOS settings.
2. In BIOS, find “Advanced Settings” or “Onboard Devices” menu (this may vary due to different BIOS manufacturers)


3. Find “USB Configuration” and disable USB Controllers to disable all USB ports.

2. Disabling through Device Manager

This method would be more comfortable for those who are not familiar with BIOS configuration.

1. Click Start > RUN
2. Type “devmgmt.msc”  (this will open Device Manager of Windows)


 3. Under Universal Serial Bus Controller, right click and click “Disable” on all the USB drives you can see under the submenu.

3. Disabling through Registry Editor

This is the most secure wasy, as the settings cannot be altered by anyone except system administrator who know how to use Registry Editor.

1. Click Start > RUN
2. Type “regedit”  (this will open Registry Editor of Windows)

3. Locate, and then click the following registry key:

HKEY_LOCAL_MACHINESYSTEMCurrentControlSetServicesUSBSTOR

4. In the right pane, double-click Start.

5. In the Value data box, type 4, click Hexadecimal (if it is not already selected), and then click OK.

6. Quit Registry Editor.


 By default the Hexadecimal value is set to 3, which means enabled. To re-enable USB ports change this value back to 3.
Sunday, April 14, 2013
How to Get Desktop Gadgets and Sidebar Back in Windows 8

How to Get Desktop Gadgets and Sidebar Back in Windows 8

As you may have noticed, Desktop Gadgets and Sidebar are missing in Windows 8 RTM. Personally, I don't miss gadgets since I did not use them. But a lot of people have been missing them. If you can't live without desktop gadgets, there is good news for you: desktop gadgets and sidebar can be made to work in Windows 8.

 
My friend PainteR has created an unofficial installer which allows you to get gadgets back in Windows 8 with just a few mouse clicks. Just follow the rabbit setup wizard.


Note that it supports all possible Windows 8 languages,  so you will get gadgets and sidebar's interface with your native language!


Wait for the installer to finish and right click on the desktop after that. You will see the familiar "Gadgets" item in your desktop context menu. Enjoy:


Before you download

  1. I am not sure that this is legal. Check the license agreement of Windows 7 and Windows 8 before you use this installer.
  2. All credits goes to Aps Logo. No one from Winaero is associated with this installer.

Download Desktop Gadgets for Windows 8

How to Download Watch This Video 

no image

Does Alexa Rank Really Matter?

Alexa Rank is one of the most over rated term when it comes to judge quality of a blog/website.Most of the bloggers and Webmasters are obsessed with Alexa Rank.

So, What is Alexa Rank?

Alexa defines themselves as web information company and it is owned by Amazon Inc.

    1.Alexa Rank gets updated on regular basis.
    2.They rank every website based upon a specific algorithm.

Alexa ranking algorithm is very much peculiar.They only count those hits which pass through their system.That means they only count those visitors who have installed alexa toolbar in their browser.

    1.So if a website has good alexa rank doesn’t mean that it has good traffic.It only mean that it has good number of visitors who have installed alexa toolbar in their browsers(Mostly Techy Guys)
    2.Generally alexa rank will be higher for the websites which are related to Blogging ,Technology , Design etc.

Should you really bother about Alexa Rank?

Again it depends upon your own perspective.

    1.If you want to attract more advertisers to your blog and earn more then alexa rank is crucial.
    2.Generally advertisers look for blogs with good alexa rank.So if your blog has good alexa rank then chances of getting direct advertisement are more.
    3.If you depend only on Traditional Advertising like Adsense and Textual Advertising then you should not really bother about Alexa Rank.

As already said Alexa has nothing to do with your traffic and search engine ranking.Your search ranking are neither shows a positive impact nor negative impact as well.So if your alexa is lower than other website then you need not worry about the search ranking or search traffic.


How to Make Robots.txt File

How to Make Robots.txt File


    1.Open your Blogger Dashboard.
    2.Then go to Settings then Search Preferences.
    3.In Search Preferences enable custom robots.txt which will be disabled by default.
    4.Enable it and paste the following code.


User-agent: Mediapartners-Google Disallow:
User-agent: *
Disallow: /search
Allow: /
User-agent: *
Disallow: /*.html
Allow: /*.html$
Sitemap: http://www.apslogo.blogspot.com/feeds/posts/default?orderby=UPDATED

5.In the above code replace www.apslogo.blogspot.com with your website url then save it. 

Custom Robots Header:

This is one more advanced feature provided by Blogger and must be used with proper care or else your blog might get completely deindexed from google.

    1.Open blogger dashboard then Settings then choose Search Preferences.
    2.Enable Custom Robots header Tags which is disabled by default and follow the below settings show in the screenshot.


Custom Robots Header for Blogger/Blogspot

    1.If you are done with all the settings then save the settings to get into effect.
Thursday, April 11, 2013
no image

10 Amazing Google Adsense Tips and Tricks

Google-Adsense-Tips-and-Tricks
Working with Google Adsense to generate a profit can be somewhat daunting, especially when you even think about all of the advanced algorithms that Google uses to weed out sites. But I have assembled 10 amazing Google Adsense tips and tricks that will help you improve your knowledge and your earnings with Google’s ad program.

1) If you want to maximize your profits, make sure to create more than one website.


However, you don’t want to start off by creating 100 websites. Maintenance for that many sites, at first, would be hectic. While having only one website would be the easiest to maintain, it also increases your chances of being cut out altogether by the latest algorithm update. So, you want to have a few websites up and running. Then if the latest algorithm forces one website out, you still have a few others to generate income from while you work on the affected one.

2) Pick a niche to write about per site
.


Creating a site that discusses any topic under the moon may be easier to find the desire to update, but it will make it difficult to create constant traffic, make it hard for the Google search engine to rank your site, and cause trouble generating ads that are on topic.
Also, if you only pick one subject to focus on, you can go more in-depth and gain expertise in that field. This makes your website more profitable for users and yourself.

3) Create a site about something you are already interested in!


This Google Adsense tip only makes sense! Making your site about something that you like makes it more fun in the long-run for you to continue managing your site. If something is less like work, then you are more likely to do it. Constant updates on your site is good for traffic and search engines, which generates clicks on your ads.
However, don’t create a site about something that is not in demand. Just because you like to study rare deep-sea anglerfish doesn’t mean that everyone else does. If you want to maximize your profits, you will need to give information about something that the general public will be researching.

4)Do not put Google Adsense on a brand new site 

!
When building a new site, wait until you have completed the site, you have built inbound links, and you are getting traffic. A brand new site can leave your ads being off topic and difficult to follow.
Also, if you try to apply to Google Adsense too early when your website is brand new, you will most likely be turned away. Google wants to know that your site has enough traffic so that putting their ads on your page will be profitable to them and you. They don’t waste time on beginner or spammy sites.

5) Do not put images next to your ads!


While many people did this for years and it worked successfully, it now against Google’s policies to do so. This is considered to be ‘encouraging clicks’ which is prohibited. If you do so, you may get more clicks for a bit, but you will quickly be caught and banned from having Adsense on your page. And once you are banned, you cannot get your account back into good standing.

Here is a free additional Google Adsense tip: If you haven’t read Google’s Adsense policies, I seriously suggest doing so.

6) Place images in optimal places on your site.


Ads that are higher on the site get clicked more often, which generates more income.

7) If you want to maintain optimal profit, do not put your ads on affiliate sites.


While well-known affiliate sites may get you more clicks than your own brand new site, you cannot depend on these sites to earn a maximum profit. It can be considered as a violation of the rules and regulations of Adsense. Moreover, each of the affiliate sites charges a percentage of your earnings to be able to post on their site. So, work on your own site, promote it to generate traffic, and be patient. Having ads on your own site will be better for you in the long-run.

8) Make sure to update your site on a regular basis.


If you create a site and leave it for a few months, you may find that your traffic has dropped significantly. Therefore, your amount of clicks and pay has dropped as well.
No one wants to visit a site that has grown stagnant and has old information, so get busy generating new information for your readers!

9) Create ads that best complement your site.


The optimal sizes for ads have been researched. They are the 336×280 large rectangle, the 300×250 medium rectangle, and the 160×600 wide skyscraper.
However, don’t simply use these sizes without integrating them into your site well. You want the overall flow of your site to be pleasing to your loyal visitors, so be sure to fit the ads in a way that is visually appealing.

10) Do not stress over the latest google algorithms, or trying to beat the system!


Google constantly updates their algorithms to cut out spammers, and this unfortunately messes up the generated income for some sites. However, there is no way to currently beat this system, so do not stress if your site sees a dramatic drop suddenly. Simply continue to work hard at improving your site and keeping up with the latest Google Adsense Tips. Hopefully, you will see improvement again in your traffic.

These are some tips that should help you a great deal when trying to maximize the profits from your ads. Overall, continue working to improve your websites and don’t stress! Everyone knows that Google owns the world in their own mysterious way, and trying to fight it will only end in multiple visits to a psychiatrist. So, be happy and enjoy Google’s business offering to the world!
Wednesday, April 10, 2013
How to Save Any Webpage as PDF for Offline Viewing Using Google Chrome

How to Save Any Webpage as PDF for Offline Viewing Using Google Chrome

There are many webpages that you find online that you may find useful for offline. This is very useful especially if you need it for future reference when you are doing research and need the webpages for future reference. You may also need to save it if you have to view the webpage when you don't have internet connection.

You don't need any other application apart from Google Chrome, which you might already have or you can easily download from here.


Now follow these simple steps to save the webpage as a PDF.

1. To save the webpage as a PDF file, open the webpage in the Google Chrome browser.

2. Right click anywhere on the page and select print.

3. The following window will appear.

4. Click on 'Change' to change the destination.

5. Change the destination to 'Save as PDF'

6. Click on 'Save' to save it.

7. Choose the destination folder where you want to save the file and save it.

That's all! Now you can easily view it as a PDF document anytime you want.


Watch this Video Tutorials 
How to make Google Chrome faster

How to make Google Chrome faster

Update your your browser.

1. Up in top right corner click the wrench or the customize and control button

2. Click on "About Google Chrome"

3.It will check for updates automatically.

Clear your Browsing History, Cookies, and Cache, etc

1. In the top right hand corner click the "Wrench button" or the" customize and control button"

2. Click "Settings"

3.Scroll down and click on the "Show Advanced Settings" button.

4. Under Privacy click on "Clear Browsing Data.."

5. Set it for all time and check every box and clear it all.

Re-install your web browser

1.Back Up your Google Chrome Bookmarks  (Watch this Video Tutorials)

2. Go to Start-Control Panel-Under Programs click "Uninstall a program"

3. Find Google Chrome in the list and right click on it and click "Uninstall"

4. If you have the setup file then you can install it by running that.

5. If you don't have it then either use another browser such as Firefox or Internet Explorer, and go https://www.google.com/intl/en/chrome/browser/ and download and install Google Chrome again.


Uninstall your extensions

1. At the top right hand corner click on the "wrench button"

2. Click on "Settings"

3. On the left hand side click "extensions"

4.Click on the trash can to the right of the extension.


Download and install Extensions


Go to the Chrome Store to get these extensions to speed up browsing.

1. Click on the wrench and go to "settings"

2. On the left side click on extensions" and at the bottem click on "Get more extensions"

3. Search for Fastest Chrome and Adblock Plus to disable ads on your webpages.

How To Save Your Bookmarks In Google Chrome

How to Protect Your Password - Mozilla Firefox Users

How to Protect Your Password - Mozilla Firefox Users

Mozilla Firefox stores your password for forever until you manually remove or uninstall Firefox Just after clicking on 'Remember' button when submitting a 'login form' on any website, Means whenever you do submit a login form on any site such as Gmail, Hubpages etc. Firefox pop up a bar at the top of webpage to ask whether it should,

    #Remember your password - to fill form entries in future automatically,
    #Not Now - Mozilla Will show that bar again in future on opening that page another time,
    #Never for this site - Mozilla will never show again that bar in future on that webpage.

Today, Most of the peoples have their own personal computer and do click on 'Remember' button without any knowledge that their password can be viewed by others with these simple steps as mentioned below.

    1,Open your browser,
    2,Click on Tools in Menu at Top of browser,
    3,Click on Options, A new window will open,
    4,Click on Security,
    5,Click on Saved password (A list of sites will appear with username),
    6,Click on Show Passwords and your passwords were now cracked.

Any person that uses your PC or Laptop can easily see your passwords without your knowledge And if you're using Public computers like in cyber cafe's and mistakenly clicked on 'remember' button then persons like me were always ready to crack it (I rarely go to cyber cafe's). So, here are the steps you can follow to secure yourself even after clicking on 'remember' button on your own PC or Laptop.

    #Do not allow peoples (Exceptions are family Members) to use your PC, Tell them to go cyber cafe as they are for those purposes only,
    #Set a Master password for Mozilla Firefox itself, Here are steps you need to follow,

    1,Go to Tools in Menu Bar,
    2,Select Options from the list,
    3,Click on Security Button,
    4,Click on Checkbox followed by this statement "Use a Master Password".
    5,A new window will prompt on screen to enter your password,
    6,Click on submit or Okay button,
    7,Now, you can go for a walk outside without worrying a little except about those who already knows that you use a same password in most places... Ha Ha.

    #Try to avoid habit of clicking 'Remember' button each time as because While writing these article, I seen a list of 40 sites whose password were remembered by my browser... Cool Huh,
    #Drop your trust on Family in these case, They will kill you for all the activities that you do on Internet.

Enjoy the browsing, Have fun after protecting your Keys.


Watch this video tutorials
Copyright © 2012 Blogger Tips and Tricks All Right Reserved