New Post

Rss

Tuesday, July 30, 2013
New Features of Android 4.3 Jelly Bean

New Features of Android 4.3 Jelly Bean

Google has announced the roll out of the next iteration of its Android operating system, dubbed as version 4.3, with the launch of its new Nexus 7 tablet. The new version will be called 'Jelly Bean' and would actually be the third version to carry the same tag after Android 4.1 and Android 4.2. The latest update comes about nine months after Google introduced Android 4.2.However as suggested by previous leaks, the new Android version doesn't bring a big makeover and comes with a few major features. The new OS is being rolled out first to Google's Nexus range of devices including the original Nexus 7, Nexus 4, Nexus 10 tablet and will ship with the new Nexus 7. We take a look at its new features.


1. Restricted profiles


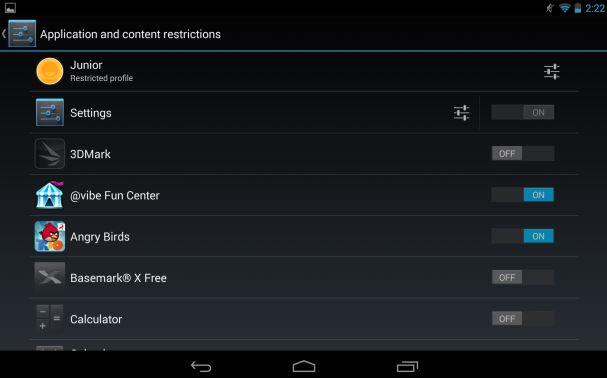
Google added multi-user profiles in the last iteration of Android and it seems the search engine giant wants to enhance that experience through restricted profiles. With the new feature, users can restrict app usage and content consumption on an Android device. So you'll be able to set profiles for each user of the device in case of multiple users. For instance, parents can control what apps or games their kids have access to on their tablets. However, it's worth pointing out that the new restricted feature is only available on Android tablets.


2. Bluetooth Smart Ready


Google seems to be making way for wearable technology by introducing the Bluetooth Smart Ready feature in Android 4.3. Devices running Android 4.3 will now support low-energy Bluetooth Smart accessories like heart rate monitors, pedometers, thermometers and many others. Users can now sync the low energy devices without these affecting the battery usage of the device, as per Google. This feature was missing on Google's mobile operating system, till now. This would also make way for Android friendly wearable tech.


3. Dial-pad Autocomplete


Android 4.3 now adds the autocomplete feature in the dial-pad suggesting contact names or phone numbers when users start keying-in something. This is not a new feature as OEMs like Samsung and HTC had already introduced this feature on to their UI skins running on top of Android, but devices running stock Android were missing it. Users can initiate the feature by going to the app settings and enabling 'Dial Pad autocomplete'


4.Notification Access


The Notification bar has been a popular feature on Android and with Android 4.3, you can control and interact with the status bar notifications. This would allow users to control how notifications are pushed to the primary and connected devices(smart watches, fitness bands). Users will also be able to see all the notifications at one place.


5. OpenGL ES 3.0


If you are a gaming junkie, the new update will definitely excite you. This feature would let Android devices render high quality graphics in games and other apps. Google claims that Android 4.3 supports the new version of the industry standard for high performance graphics. Google also gave a demo of a game showing detailed textures, lens flare, and reflections. This was missing in Android 4.2.


6. Simplified Setup Wizard


Android Jelly Bean now supports corrections to user inputs while signing-in to the device, the first time. This is due to more streamlined user agreements. Now a user can change the information that was keyed-in during the first boot of the device. Google has also introduced faster user switching from the lock screen in case of multiple users.


7. Bluetooth AVRCP


Google devices running Android 4.3 Jelly Bean can sync with Bluetooth enabled car stereos and offer additional functionality. The Bluetooth AVRCP 1.3 version allows stereos to display metadata such as song names when music is being streamed from an Android 4.3 device.


8. Location accuracy features via Wi-Fi scan only mode


Google has now increased the location accuracy of Android devices by allowing location scanning via Wi-Fi.
It now allows apps to get location data through Wi-Fi even when Wi-Fi is set to off and not being used for data access.


9. Keyboard & input


Android 4.3 comes with an upgraded algorithm for tap-typing recognition that makes text input easier while chatting via messages or even while composing emails. It also brings a new emoji keyboard, which we've previously seen in iOS. The update also adds lower latency input for gamepad buttons and joysticks.


10.Hindi support lands on Android 4.3


Google has introduced native local language support to its operating system for Africaans, Amharic, Hindi, Swahili and Zulu. Hindi has finally reached the stock Android operating platform.
With the update, Google has also added support for Hebrew and Arabic (right-to-left) in the home screen, Settings, Phone, People, and Keep apps.


Bonus - New Camera UI


Android 4.3 also offers a new updated Camera app that features a new arch based menu which makes it easier to control and switch camera settings.
How to Get Android 4.3 On Your Nexus Device

How to Get Android 4.3 On Your Nexus Device

Google unveiled the second generation Nexus 7 tablet with Android 4.3 Jelly Bean at an event in San Francisco on Wednesday. The update is an incremental one when it comes to user facing changes, but brings a number of new features under the hood.

While the updated OS will ship with the new Nexus 7 tablet, Google has announced that it has started rolling out the Android 4.3 update to Nexus devices including the original Nexus 7 tablet, the Nexus 10 tablet, and Nexus 4 and Galaxy Nexus smartphones.

The update will be available over the air through the Settings menu on the devices. It will roll out gradually and it could take weeks before it reaches all devices. Our Galaxy Nexus smartphone has not received the update, at the time of writing this post.

You can also force your device to check for updates by going to the Apps menu from the Settings, and finding the Google Services Framework app. You can then tap on 'Clear data' and 'Force stop' options and check for the update again from the About settings menu. This doesn't harm your device in any way and is a completely safe option. However, it's not guaranteed that you'll get the update after performing these steps.

For the more adventurous, the full factory images of Android 4.3 are also available through the Android Open Source Project online, on the Google Developers website. However, you'll need to flash these images manually using special tools and unless you're pretty sure of what you're doing, we'd recommend waiting for the official update to hit your device.

Hugo Barra, Vice President of Android product management at Google also announced that the stock Android Google editions of the Samsung Galaxy S4 and the HTC One would receive the update as well, though he did not specify a timeline
Monday, July 29, 2013
How to Install Android Apps from the Google Play Website

How to Install Android Apps from the Google Play Website


Installing Android apps to your phone or tablet from any computer with a web browser


Google is one of the biggest web service companies around. Their cloud-based apps and services can do some pretty wild and wonderful things, and we're about to look at one of them -- installing apps to your Android device remotely through the Google Play website.

All the complicated issues, like making sure apps are compatible and available for you, or keeping track of which device(s) you're currently using are done by Google behind-the-scenes, leaving us with just a few clicks needed to make some serious magic happen. All you need is an Android device registered with Google Play, and a computer with a modern web browser.

There's a complete video walkthrough of the process after the break, but we'll spend a few minutes and talk about it as well. This is the way I install almost all my apps, because I only have to find them once and can install them to any device I may have in service. It goes a little something like this.

Visit our Google Play mini-site for everything there is to know about Google Play


Point your browser at the Google Play website, and and choose Android apps from the "Shop" drop down in the upper left corner. You're whisked to the Android app store, where you'll find a slew of apps ready and waiting for you to install to your Android device. Finding the right app (the hardest part of the process sometimes) is up to you, but you'll notice plenty of blocks of featured apps, as well as a category list. Once you find the app you need to install, you're almost done!

On the apps page, near the left margin, click the Install button. You're presented with some information about the app you chose to install including those important app permissions and a drop down to select which device to install it to. If you only have one Android device you're all set, but if you have more than one just choose the right one from the list. Once that's done, click the continue button. If it's a paid app you'll be presented with payment options, and it will walk you through the process. 


Afterwards, all that's left is to grab your Android device and enjoy your newly installed app.
Monday, July 22, 2013
How to Change Wordpress Page URL

How to Change Wordpress Page URL

Attention WordPress users and future WordPress users! This post is the first of many in our new series “WordPress Tips”. Each month a new tip will be posted that will expand your arsenal of WordPress knowledge. We plan to start with the basics and build from there.

So without further ado, this month’s WordPress tip is…how to change the URL of a page or post.
When you create a new page or blog post, WordPress automatically uses the title to create that page’s URL. In some cases this might be exactly what you want, but not always. That’s where this useful tip comes in! It is important to optimize your URL for search engines, keep in mind what a person looking for the information on that page might search for. Create a simple, easy to remember URL if you are including it on printed marketing materials or verbal advertising like radio that encourage recipients to visit that page. Take these few steps to change your webpage URL:

    → Login to WordPress
    → Open the existing page or create a new page
    → Enter a Title if necessary
    → Save the page, this will automatically create a URL
    → Look directly under the title field, you will see Permalink: followed by the URL
    → Click the Edit button behind the link
    → ype in the new URL and click OK
    → Save the page or post


Keep in mind, if you go back to a published blog post or web page and change the URL, you will want to confirm there are no other pages linking to the old URL.  If you have provided others the URL, used it in an email, etc. you will not want to change that URL.

Put your new WordPress knowledge to use, customize the URL of one of your new blog posts or pages. The possibilities are endless!

Do you use web pages in your traditional advertising?  Is this tip useful for your marketing needs?  Let us know in the comments below!
Friday, July 12, 2013
How To Turn On WiFi In Windows 8 With Command Prompt

How To Turn On WiFi In Windows 8 With Command Prompt

Who says Microsoft didn’t include Wi-Fi feature in windows 8. They actually included this feature but it’s kind of hidden from users. Windows 7 users easily create Wi-Fi hotspot because they have this feature already visible in the network connection. But for windows 8 users it’s not visible their so they suffer to share internet with their Wi-Fi devices. You won’t suffer after read this post. There are many ways to create hotspot in windows 8 either you can use command prompt or a software to turn on Wi-Fi in windows 8.

  
Enable WiFi with command prompt

First make sure you got the correct driver installed in your computer you can check your driver compatibility. Open command prompt and write the command line: netsh wlan show drivers
If it’s says Hosted network support: yes then you can continue or in case it says Hosted network support: No then you must update your WiFi driver or change Wi-Fi adapter.


    → Open command prompt as administrator
    → Type the command line given below:

    netsh wlan set hostednetwork mode=allow ssid=name key=password
    → Now turn on your Wi-Fi if it’s off and enable your Wi-Fi adapter
    → Type the command given below to start your hosted network

    netsh wlan start hostednetwork
    → It will display the hosted network started. Now close command prompt
    → Open Control panel and set it to view by large icon
    → Now select Network and Sharing Center you will see your newly created wifi network
    → Click Change adapter settings and select properties of your default network
    → Click sharing tab and check on check the option “Allow other network users to connect through this internet’s connection" and select your recently created network name under Home networking connection.

Note: replace name with any name you would like to have as a Wi-Fi hotspot name and use any password. Make sure your ssid name and password contain more than 8 digit or character.
That’s it now enjoy your wireless network with your Wi-Fi devices like android, iPhone and laptop etc.
Thursday, July 11, 2013
HostGator Review2013-Web Hosting

HostGator Review2013-Web Hosting

Choosing the best website hosting company can be a difficult decision for anyone about to launch a new website.  When it’s your first attempt at building or hosting a website, it can be even more difficult to determine who is the best and if you’re getting a good deal.  When it comes to website hosting, this HostGator review will show you that HostGator is one of the best choices available. 
HostGator Website Hosting Review 2013

HostGator is based in Houston, TX and was founded in 2002 by Brent Oxley in his dorm room.  While that may not sound appealing, the company has grown exponentially and currently has more than 10,000 servers.  The company provides word class website hosting solutions including shared hosting, VPS, reseller hosting and dedicated servers.

HostGator Website Hosting – Pricing

HostGator offers a wide variety of website hosting packages starting from $3.96/mo.  For their normal website hosting packages, the pricing is as follows:

   ► Hatchling Plan - Starting at $3.96/mo

       
→Single domain
       
→Unlimited disk space
       
→Unlimited bandwidth
       
→Shared SSL certificate

   ► Baby Plan – Starting at $6.36/mo
       
→Unlimited domains
       
→Unlimited disk space
       
→Unlimited bandwidth
       
→Shared SSL certificate

   ► Business Plan - Starting at $10.36/mo
       
→Unlimited domains
       
→Unlimited disk space
       
→Unlimited bandwidth
       
→FREE private SSL & IP
       
→FREE Toll Free Number

HostGator Website Hosting Features

One of the biggest benefits that HostGator has to offer is their enormous selections of freebies and features that come with any of their hosting packages.  Their cPanel does take a bit of getting used to if you’re not familiar with it, but with that said their customer support team is extremely helpful and their knowledge base will help you do just about anything you need to.

    →Unlimited disk space and bandwidth
    →Easy to use control panel (for most people)
   
→Unlimited subdomains, FTP accounts and email accounts
   
→99.9% uptime guarantee (every other hosting company will claim this as well)
   
→45 money back guarantee (not many people offer this)

Free Website Building Tools

HostGator separates itself from the crowd by offering tons of free tools and the tools offered to help you build your website are second to none.

    →Instant installs of 75+ scripts and CMSs (WordPress, Joomla, Drupal, Magneto, etc)
   
→BaseKit website builder
   
→4500+ free website templates
   
→Free website transfers including domains, databases, etc
   
→Free Adwords coupons (everyone is offering this)

HostGator Reliability and Uptime

As I mentioned before, HostGator, just like all other website hosting companies are offering 99.9% uptime.  Most companies can actually stand by this unless their reselling someone else’s servers or hosting from their own basement.

HostGator uses SoftLayer’s data centers which have a tremendous industry reputation.  Their servers are located in Dallas, TX which puts them in a great location no matter where you are in the United States.


Top Notch Customer Support

One thing that I have come to love about working with HostGator (yes, I do have a reseller hosting account with them, as well as a few with Godaddy and a few others) is their customer support staff.  They have never let me down and have always made sure that I walk away satisfied for the most part.  I did have one bad experience with a chat tech that I can’t believe actually happened, that being said, I never actually pursued and action with them over it.

HostGator offers 24/7 phone support via their 800 number, live chat (which is my favorite feature as I don’t have to talk to anyone) and of course email/ticket support.


Extensive Website Hosting Knowledgebase

The most impressive part of HostGator’s support service is that they set you up to never need to call them.  They have a HUGE knowledge base online that answers just about any question you could ever ask them, and it goes into extreme detail with step by step instructions for everything.  Many of these tutorials also contain video, so you don’t even have to bother to read.


Conclusion

Overall, HostGator is a great company to work with and I can honestly say I haven’t had much to complain about when working with them.  The only downside that I can really mention is that their pricing is a few bucks higher than many other hosting companies, but with the support and features they have to offer, along with great server speed, it’s worth the few extra dollars if your looking for a good shared hosting company.


Coupons 

To Receive 25% Off, Use the Hostgator Coupon "apslogocom" By Clicking the Link Blow.


Wednesday, July 10, 2013
How to Add a Follow Button to Your Facebook Profile

How to Add a Follow Button to Your Facebook Profile

Facebook has a lovely feature which let people to follow you. This feature works like Twitter where you can follow everyone so that you can read some spicy news from them. But here you can only supplement this follow button if you are over 18. That’s why after 1 year of my blogging carrier, I have added this button to my profile.

By the way, the trick looks very easy and also can be concluded within a moments. And don’t worry; you will have the full access over your followers and also them who can follow you. Actually, this feature works fine with every famous people as naturally they do not accept friend request from outside of their circle. Isn’t? At such like this situation, you can simply follow him/her or someone will follow you for getting further updates.


How to Add a Follow Button to Your Facebook Profile?

 Sign in to your Facebook account and go to here. Here you can find a button that will ask you whether you want to turn it on or not. Obviously, you must have to click on this button. 


After that you will get a screen that will help you to manage your followers.


 That’s all! If you want to check whether you have done successfully or not, you can check your profile in Public view. You will get a screen something like the following picture.
That’s it!
Friday, July 5, 2013
How to Run, Download Android Apps for PC (Windows/Mac)

How to Run, Download Android Apps for PC (Windows/Mac)

Have you ever thought to download android apps for pc or run android apps on pc  If not then today I will tell you how to download android apps for pc and after downloading, how to run android apps on pc?
There are three things which must be done to play or run android apps on pc and they are written below:

→ First you have to download android apps for pc which you want to run on your PC or computer.
→ Then you need to download an emulator which will run android apps on PC.
→ Then you need to install android apps on pc and run it using the emulator.

How to download android apps for pc?


There are no special android apps for pc; you can run any android app on PC by using an emulator like Bluestacks or IntelAppUp. Remember, some apps might not be compatible with the software. So downloading android apps for pc is not so tough. Just go to Google and search for the apk file of android app you want to install on PC and then download it. You can skip this step and try alternate method also, which is explained below 

How to Download Emulator to run android apps for pc?

You can download any android emulator for PC either Bluestacks or IntelAppUp from the following links.

Download Bluestacks OR Download IntelAppUp


After downloading install those on your PC and open them now search the android apps you want to play, from search box. By doing this you need not to download android apps for PC as explained in step 1.


How to install android apps on PC?

To install android apps on pc  type in search box of emulator and download those. Otherwise if you have downloaded android apps on pc as explained in step 1, you can open those apps with any of these emulators and they will be installed on your PC.


How to Play or Run android apps on PC?

To run android apps for pc, search the installed file and open it by clicking twice. Your android app will be opened on your PC  Now you can play android apps on pc  Share your views about android apps for pc.


Thursday, July 4, 2013
How to Make a Photo Slideshow for Blogger/WordPress Post

How to Make a Photo Slideshow for Blogger/WordPress Post

Blogger gives you the ability to publish photos on your blog using a slideshow, which automatically rotates pictures on your page. These animated images are an entertaining feature for your visitors, and they give you the opportunity to create eye-catching displays out of your media. As long as you have your photos hosted on a photo management service, such as Flickr or Photobucket, you can build a slideshow using Blogger's slideshow gadget.


First, we capture them in pictures. Then we use social media, blogs and websites to make them visible for friends or a larger audience. If you use Blogger, make the most of it and post a nice  photo slideshow on it .

You can make a photo slideshow with PhotoSnack:


1. Go to PhotoSnack and log in
2. Upload photos
3. Choose a template and customize the settings
4. Publish – Copy the embed code


Post photo slideshow to Blogger

1. Log in
2. Create new post
Wednesday, July 3, 2013
How To Run Whatsapp In Your PC

How To Run Whatsapp In Your PC

Today We Are Sharing How To Run Whatsapp In PC their are may ways to run Whatsapp In PC and  their are may appication to run Whatsapp In PC but we came simple methotd to run whats App in your PC.Whatsapp is one of the famous messengers in android for SmartPhone and you can also see Safe Your Android Gadgets With Best Antivirus.

Whatsapp Messenger is currently available for almost all leading SmartPhone Operating Systems like Android, iOS, Windows, Blackberry.when you installing Whatsapp In Your PC You Can Get complete access and send messages to our friends from Yor PC.

Do You Want To Install Whatsapp In Your PC You Can follow Some step:


Install Whatsapp on PC Step By Step:


1.First you Bluestacks Download and

2.Install Bluestacks application on your PC 


3.When Bluestacks Intall your Pc You can search For Whatsapp

4.Now click Whatsapp to download it.

5.Now Click on Whatsapp and fill your details

   And Enjoy
Tuesday, July 2, 2013
Google Maps Gets Updated 3D Imagery For 50 U.S. Cities

Google Maps Gets Updated 3D Imagery For 50 U.S. Cities

Google today announced one of its largest updates to Google Maps’ 3D imagery since it launched last year. The service now covers a number of additional cities that weren’t included in the previous releases. Most of these are smaller towns like Las Cruces, NM and Bend, OR. The company also released updated imagery for a number of cities, including, for example, San Francisco, CA.


Here is a full list of towns with new or updated 3D imagery:

Anniston, AL; Auburn, AL; Barstow, CA; Bastrop, TX; Bend, OR; Birmingham, AL; Boulder City, NV; Buffalo Core, NY; Cape Girardeau, MO; Casper, WY; Cheyenne, WY; Chicago, IL; Chico, CA; College Station, OH; Delano, CA; Desert Hot Springs, CA; Dubuque, IA; Edmonton, NY; Enid, OK; Farmington, NM; Grand Forks, ND; Grand Junction, CO; Great Falls, MT; Hanford, CA; Healdsburg, CA; Helendale, CA; Hot Springs, AR; Idaho Falls, ID; Kelso, WA; Killeen, TX; Las Cruces, NM; Lawton, OK; Leeds, OK; Madera, CA; Malibu, CA; Merced, CA; Modesto, CA; Ocala, FL; Odessa, TX; Ojai, CA; Picture Rocks, AZ; Pittsburgh, PA; Prescott, AZ; Rapid City, SD; Redding, CA; Riverside, CA; San Angelo, TX; San Francisco, CA; St George, UT; Texarkana, TX; Twentynine Palms, CA; Victoria, TX; Winnipeg, TX; Yuba City, CA.

With this update, Google is clearly on a path to bring 3D imagery to the majority of larger U.S. cities, something it promised to do when it first launched this service last year.

Microsoft, which previously featured 3D imagery in its mapping service but then dropped it in Bing Maps, also recently announced that it will add 3D building to its mapping product again. These images, Microsoft says will be newly captured just for this new 3D feature. Microsoft, we hear, plans to launch its 3D imagery for about 100 cities, but it’s not clear if those will all be in the U.S. or if this will be an international launch. The first demo I saw of Microsoft’s service easily rivals Google’s imagery.
Monday, July 1, 2013
Control Your Computer with  Your Voice Dragon Naturally Speaking 12

Control Your Computer with Your Voice Dragon Naturally Speaking 12

Dragon NaturallySpeaking 12, the world’s most accurate and best-selling voice recognition software. Dragon ignites new levels of productivity and convenience by enabling you to interact and control your PC by voice, create and edit documents, cruise through email, surf the Web and more by simply speaking.
   
Dragon 12 has more than 100 new features and enhancements so you can stop typing and start talking to get more done in less time. Dragon 12 boasts a 20 percent improvement to out-of-the-box accuracy, faster speeds and even more ways to customize your experience by allowing you to specify preferences and
commands. In addition, Dragon 12 now features enhanced support for Gmail and Hotmail, and extends support for the free Dragon Remote Microphone App experience to Android devices so you can use Dragon no matter where life takes you.


Dragon is already used by millions of consumers worldwide, and is the core technology powering an
innovative portfolio of voice technologies, including Dragon Dictation, Dragon Go!, Dragon TV, Dragon
Drive! and Dragon ID.


What’s New in Dragon NaturallySpeaking 12?


Even More Accurate
Enhanced Web Mail
Faster Than Ever
Interactive Tutorial
Wideband Bluetooth Support
Smart Format RulesMore Natural Text-to-SpeechFaster CorrectionDragon Remote Mic – Now for Android

Control Your Digital World by Voice Using the World's Best-Selling Speech Recognition Software for the PC
Wednesday, June 26, 2013
How to Check Your Antivirus is Working?

How to Check Your Antivirus is Working?

Here is a common method to determine if your antivirus program is working properly or not. Some of you may know it already, but for the beginner (noobs) this can be informative.


► Open Notepad and copy/paste the Code given below.


X5O!P%@AP[4\PZX54(P^)7CC)7}$EICAR-STANDARD-ANTIVIRUS-TEST-FILE!$H+H*

► The text should be in one horizontal line.

► Then save file as "checkantivirus.com" including quotation-marks.

► After some seconds saving this file, your Anti-Virus should notify you with the message that this file is infected with a virus asking permission for its deletion/clean.

► This file is secure and it’s not going to infect your computer in any way. It is a standard text developed by the European Institute for Computer Anti-virus Research (EICAR). Every Anti-Virus is programmed to load this file as a virus.

► If your Anti-Virus did not detect this file as a virus, a program will appear as DOS window with this text EICAR-STANDARD-ANTIVIRUS-TEST-FILE.

► If this happens then you should probably find a better Anti-Virus. It means that your PC might already be infected with viruses and your current Anti-Virus does not recognize them.
How to Check Which Version of Android your Device is Running

How to Check Which Version of Android your Device is Running

There's a quick way to check the version of the operating system that your handset runs on, be it a Samsung Galaxy model or any Android-powered smartphone.


► Access the Settings menu, which is normally found by tapping the Menu button at the bottom left of the front panel and then selecting Settings or System settings. 

► Look for the 'About phone' or'About device' listing and click on it. The actual location will vary from device to device, for example on the 


Galaxy Ace ite is the last item in the Settings list and on the Galaxy S4 it is found within the More tab. A detailed list of your phone's particulars will appear and on this the Android version will be displayed.

The screen above was taken on the Samsung Galaxy Ace. If you're felling brave, click on Software update to see if there is a more recent version of Android you can upgrade to.


Android OS: what's in a name?

There's a logic to the bizarre-sounding names for the different versions of Android; they're all sweets or dessert items and follow an alphabetical order. Here's the full list:


Tuesday, June 25, 2013
How to Remove your IP address from the Spam Blacklist

How to Remove your IP address from the Spam Blacklist

If you are setting up a mail server at home, you will wonder why the recipient cannot receive your email which is sent by your mail server. The reason is that your IP is blacklisted.

 How to overcome this problem? It is quiet easy and just send a request to the Spamhaus.org to cancel your IP from the blacklist. For example, your IP is 219.192.114.214.

http://spamhaus.org/query/bl?ip=219.192.114.214

If you find any item is in red colour (e.g. PBL), your IP is blacklisted. You just click on the link under the red coloured item. Then, select "Remove an IP from PBL" button. Usually, SBL and XBL are in green colour.

Accepted the agreement and click "Remove IP address" button. Finally, fill in the blanks and wait for the confirmation email for the confirmation code to fill into the screen provided after you sent the request.

Make sure your email address is not a web based free account, such as gmail, hotmail, or yahoo and etc.
Friday, June 14, 2013
How to Make Money Writing for Hubpages

How to Make Money Writing for Hubpages

What is Hubpages?

Before I start getting into detail, I should explain the basics. Hubpages is a website that basically allows you to publish an article on their site. I use the term “article” loosely because it can be as short as an article or more like a single page website. It is completely up to the user. A hub (their lingo for article) can be about any topic you could possibly want to write about. You could create a hub explaining 10 things you wished people knew about you, how to play guitar with your toes, or facts about albino grizzly bears.

 You do not need to be a great writer and honestly, I have seen some people who are terrible writers do quite well. All you need is the ability to say a little bit about something. And who knows maybe hubpages will be the first step to helping you make money from a blog?

So how do you make money with Hubpages?

There are actually a variety of ways, but the simplest and most effective way I have found so far has been by using Google Adsense. After you finish your first hub you can install your Adsense ID and you will begin sharing the revenue with Hubpages for your hubs.

If you pick good keywords (which I will get to in a minute) you will likely begin getting traffic from the search engines within 24 hours of publishing it. If these visitors click on the ads you will get a cut of that revenue (I think it is 60%).


My results during July

I spent most of July trying to create a hub every day or so and I am now up to 23 hubs. I didn’t do the best job with keyword research and did very little if any work after creating the hubs and yet adsense still made $47.14 in March.

This breaks down to $2.05 per hub/month. Two dollars doesn’t sound too exciting, but if you consider that is probably completely passive income it is pretty exciting. In theory, that $2 per hub should continue paying that each month – and to be honest most pages do better in the search engines after they have been around a few months or more. So it very well could increase over time as well.

I am going to continue to create some more hubs during the month of August and see what the results are. I will try to keep this post updated with the new results each month.


Steps to get started

If you are interested in giving this a shot, these are the steps to get started.

    ► Sign up at Hubpages
    ► Create your first hub. Once you get to the design page, it is pretty self-explanatory.
    ► Sign up for an Adsense account (if you don’t have one). This might take a couple days to get approval.
    ► Add your Adsense ID to Hubpages. When you are logged into Hubpages, you click the “My Account” button, and then the “Affiliate Settings” link. This is where you will install your Adsense ID.
    ► That’s it. Once it is installed, you will begin making money when someone clicks on the ads. Warning: do not click the ads yourself or tell others to click them. Google will catch you and will ban you from the program.


Keys to succeeding

Keyword research

This is probably the most important part. The title of your hub needs to be based on your keyword research. A good place to look is Google’s Keyword Research tool – drop in some keywords that your article might be about and see what comes back at you. I believe this is more of an art than a science, so just find a keyword phrase that is being searched for and give it a shot.

But I do suggest looking for longer phrases, i.e. Don’t title your page “ipods” but something like “how to put music on your ipod” would likely work a lot better. But either way, you just have to test to see what works. Sometimes your research will work just like planned and other times it won’t. But the good news is that even if you don’t do any research, you still have a chance of picking up some visitors on Hubpages. But, the more you plan out your keywords the better you will do.


Get Links

Like I mentioned above, I didn’t really get many links to my hubs, but if you can link to it from your blogs and get other links it will definitely be helpful. Submitting it to social bookmarking sites might be helpful as well. Linking your hubs to each other is a good idea too.


Content

Generally speaking the more content you put on your hub the better. I would say 400 words should be a minimum. Shooting for 600-1000 would probably be best. And add as many of the widgets as you can. You can add a news widget, a poll to ask your readers a question, etc. You don’t necessarily NEED to add a bunch of widgets, but it will probably help.


Learn and adapt

Not all hubs will work. In fact, for me of the 23 I have created thus far 5 of them are generating about 90% of the traffic.


Referral Program

Per a reader’s request to discuss the referral program, I will touch on that. The links to hubpages in this article are referral links. I haven’t referred any users in the past and honestly don’t really know how or how much can be made from the referrals – but if anyone signs up via the links, I will add that to the update next month.


Thursday, June 13, 2013
How to Make Money from Home with WebAnswers

How to Make Money from Home with WebAnswers

 In today's tough economy, many people are turning to the internet in search of a way to earn extra money from home. With the endless scams out there, it can seem nearly impossible, and become quite frustrating. As a single mother of two, I know what it is like to not just want an extra income, but to actually need some extra cash in your pocket. So, I am going to tell you about a website that I accidentally stumbled across, that has made me more money in one month than I have earned on other sites in six months. That website is called WebAnswers.


WebAnswers is an extremely easy to use site, which is loads of fun, and can become very addicting if you aren't careful. The gist of WebAnswers is that you get paid to answer questions that other internet users ask. I know it sounds too good to be true, but it isn't. Here's how it works:

To start, you have to sign up for a WebAnswers account. It doesn't cost anything to sign up, and you don't have to provide any credit card numbers. Simply enter some information, including your email address, and decide on a password.

Once you have signed up for an account, you have to start answering questions. WebAnswers states "Once you have answered 50 questions, you'll receive an invitation to open a Google AdSense account". I personally answered 47 questions, and asked 3, and I was able to link my Adsense account. I know other contributors to WebAnswers who did something along the same lines as I did, instead of just answering 50 questions. Whatever combination you choose to do, the point is to make 50 posts on the site.

When you have reached your 50 posts, you will be able to go onto your account page, and apply for a Google Adsense account. A Google Adsense account does not cost anything either, so don't worry. You do not need to put out any money to make money through WebAnswers.

If you aren't familiar with Adsense, let me explain as simply as I can. When you create a page of web content (which is what your answers on WebAnswers are considered), Google goes on those pages, and puts ads on them. When other users see your content, and click on the ads, you share part of the revenue gained from that click. Google also pays you based on the amount of traffic your content receives. There's a lot more that you can learn about Google Adsense, and how it works. That is just the very basic information.

So, you make your 50 posts, and apply for your Google Adsense account. This process is pretty simple, and doesn't take a long period of time. If you already have an Adsense account (as many online content writer's do), you can link your WebAnswers account with Google instantly.

Once you have linked your two accounts, don't be surprised to see your earnings start to come in, just from those initial 50 posts you made. Granted, it will only be a few cents at the very beginning, but they will be there.

Personally, I thought the way that WebAnswers explained exactly how you make money was a little confusing at first, until I finally understood it. To keep you from feeling that same confusion, I am going to spell it out for you. This is how WebAnswers works, and how you make money:

People go on the website and ask questions. You log in, and use your knowledge (and yes, you have some even if you don't think you do) to answer those questions. The person who asked the question then comes back and "awards" the best answer. Or, that's how it is supposed to work, but as you will see when you visit the site, many questions do not have awarded answers, because sometimes the "asker" never comes back or the questions were asked by a "bot" when the site was just beginning. But, these unawarded answers can become your best friend.

The WebAnswers site states "Once an answer you have posted is selected as the best answer for the question, you will earn a percentage of the revenue generated by that question from Google AdSense". I find that statement to be misleading, because the truth is, you earn on all the answers and all the questions that you post, at least to some extent.

When you ask a question on WebAnswers, you and the people who answer your question go into a rotation to earn off the ads on that page. Everyone continues to earn off that one question, until you go back and select an answer as the best answer. Once you do that, then the only person who continues to earn on that page is the author of that answer.

When you answer a question, you, the author of the question, and the other people who offer up answers, all go into that same rotation to make money on the page. When the author of that question comes back and selects your answer as the best answer, then you will be the only one to earn revenue off of that page's ads for the next year. If your answer is not selected as the best answer, then you will no longer receive any earnings from that page. If no answer is selected, then everyone continues to earn revenue from that page.

The site says the goal is to receive "awarded answers", but as many WebAnswer users will tell you, they earn more off of the questions that never select an answer as the best answer, than they do off the pages of their awarded answers. I have yet to notice a difference, but then I haven't dug too far into this either.

As you continue to answer questions, receive awards, and generally use the site consistently, you improve what is known as your Quality Score. As your Quality Score increases, the website starts to put ads randomly through out the site for you, to help you earn even more money. So, don't be surprised to see earnings come in from a category that you never answered a question in!

As I stated, WebAnswers is very easy to use- just go on, and start answering questions. Even if you don't completely get how it works in the beginning, you will pick up all the information you need to be successful. I have been with WebAnswers for not quite a month yet, and have earned triple what I earn on other sites. I would give you an exact amount, but that is against Adsense policy, so I can't.

When I stumbled across the site, I joined in hopes of making money. After spending some time there and getting to know some of the other users however, it became more about having fun and making money was just an added bonus. As a single mom, I am thrilled that something I now consider fun, is making me residual income. I even answer questions on my Iphone while sitting at the doctor's office with one of my kids!

If you are looking for a way to stay at home and make some extra money, I would definitely recommend WebAnswers. It won't make you rich, but if you put forth the effort, you can definitely earn a few hundred dollars or more from it. How much you earn will depend on you, but there are users who are making $500 or more a month just by answering questions.
How to Add a Print it Button to Your Blogger Blog

How to Add a Print it Button to Your Blogger Blog

 Allowing your users to print your blog posts with just a single click is something that is pretty cool. On the other hand, almost all browsers provide the flexibility to print a web page by just going to “File” and “Print”. Different people have different choices and different people like to have a print feature on their blog posts for different reasons. You may just like to add a continent way. When users can print your posts with just one click then why they should be doing some complicated processes? In this article, we will show you how to add a quick print button to your Blogger blog.
 The First thing you will be doing is to login into your Blogger Dashboard. Now After logging in, go to your blog >> Template >> Edit HTML >> Search for <div class='post-header-line-1'/>  and just above it paste the following code. Once everything is done, press “Save Template” button to conclude the process.

<div style="float: left; padding-left: 10px;">
<a href="javascript:window.print()" rel="nofollow">Print this Article</a></div>

Now to give your button a beautiful touch, you need to customize it with a bit of CSS. You can create any kind of image using any popular photo editing or deigning tool Like Photoshop and can simply apply the modest CSS to make it work. Here is a small example of how you can stylize your print it button.

<div style="float: left; padding-left: 10px;">
<a href="javascript:window.print()" rel="nofollow"><img src="http://1.bp.blogspot.com/-vw5LhfD0cTI/UPLhsZx8ksI/AAAAAAAAAdo/w7Aqf4eEstA/s1600/images.jpg" /></a></div>

Congratulations: You have successfully learned how to add print it button in blogger blog. Not only that, but you can also stylize it according to your desire needs. You can also preview your posts to see everything is working in an order or not. We hope this tutorial has facilitated to understand how to add print it button in blogger. What are your judgments about adding a Print button to your blog? Does it is value to use these buttons or it is just waste of space? Let us know what you think about it.
Copyright © 2012 Blogger Tips and Tricks All Right Reserved