As you may have noticed, Desktop Gadgets and Sidebar are missing in
Windows 8 RTM. Personally, I don't miss gadgets since I did not use
them. But a lot of people have been missing them. If you can't live
without desktop gadgets, there is good news for you: desktop gadgets and sidebar can be made to work in Windows 8.
My
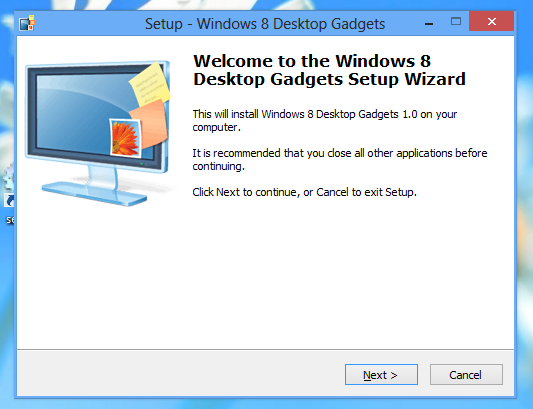
friend PainteR has created an unofficial installer which allows you to
get gadgets back in Windows 8 with just a few mouse clicks. Just follow
therabbit setup wizard.
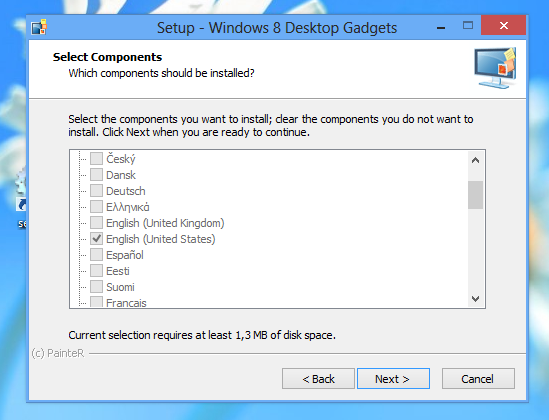
Note that it supports all possible Windows 8 languages, so you will
get gadgets and sidebar's interface with your native language!
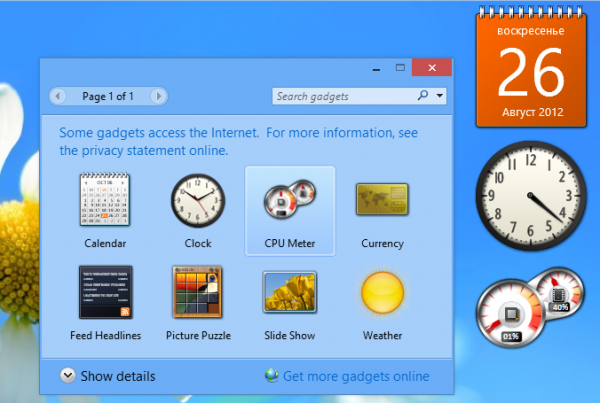
Wait for the installer to finish and right click on the desktop after
that. You will see the familiar "Gadgets" item in your desktop context
menu. Enjoy:
Before you download
I am not sure that this is legal. Check the license agreement of Windows 7 and Windows 8 before you use this installer.
All credits goes to Aps Logo. No one from Winaero is associated with this installer.
Alexa Rank is one of the most over rated term when it comes to judge quality of a blog/website.Most of the bloggers and Webmasters are obsessed with Alexa Rank.
So, What is Alexa Rank?
Alexa defines themselves as web information company and it is owned by Amazon Inc. 1.Alexa Rank gets updated on regular basis. 2.They rank every website based upon a specific algorithm. Alexa ranking algorithm is very much peculiar.They only count those hits which pass through their system.That means they only count those visitors who have installed alexa toolbar in their browser. 1.So if a website has good alexa rank doesn’t mean that it has good traffic.It only mean that it has good number of visitors who have installed alexa toolbar in their browsers(Mostly Techy Guys) 2.Generally alexa rank will be higher for the websites which are related to Blogging ,Technology , Design etc. Should you really bother about Alexa Rank?
Again it depends upon your own perspective. 1.If you want to attract more advertisers to your blog and earn more then alexa rank is crucial. 2.Generally advertisers look for blogs with good alexa rank.So if your blog has good alexa rank then chances of getting direct advertisement are more. 3.If you depend only on Traditional Advertising like Adsense and Textual Advertising then you should not really bother about Alexa Rank.
As already said Alexa has nothing to do with your traffic and search engine ranking.Your search ranking are neither shows a positive impact nor negative impact as well.So if your alexa is lower than other website then you need not worry about the search ranking or search traffic.
1.Open your Blogger Dashboard. 2.Then go to Settings then Search Preferences. 3.In Search Preferences enable custom robots.txt which will be disabled by default. 4.Enable it and paste the following code.
5.In the above code replace www.apslogo.blogspot.com with your website url then save it.
Custom Robots Header: This is one more advanced feature provided by Blogger and must be used with proper care or else your blog might get completely deindexed from google.
1.Open blogger dashboard then Settings then choose Search Preferences. 2.Enable Custom Robots header Tags which is disabled by default and follow the below settings show in the screenshot.
Custom Robots Header for Blogger/Blogspot
1.If you are done with all the settings then save the settings to get into effect.
Working with Google Adsense to generate a profit can be somewhat daunting, especially when you even think about all of the advanced algorithms that Google uses to weed out sites. But I have assembled 10 amazing Google Adsense tips and tricks that will help you improve your knowledge and your earnings with Google’s ad program.
1) If you want to maximize your profits, make sure to create more than one website. However, you don’t want to start off by creating 100 websites. Maintenance for that many sites, at first, would be hectic. While having only one website would be the easiest to maintain, it also increases your chances of being cut out altogether by the latest algorithm update. So, you want to have a few websites up and running. Then if the latest algorithm forces one website out, you still have a few others to generate income from while you work on the affected one. 2) Pick a niche to write about per site. Creating a site that discusses any topic under the moon may be easier to find the desire to update, but it will make it difficult to create constant traffic, make it hard for the Google search engine to rank your site, and cause trouble generating ads that are on topic. Also, if you only pick one subject to focus on, you can go more in-depth and gain expertise in that field. This makes your website more profitable for users and yourself.
3) Create a site about something you are already interested in! This Google Adsense tip only makes sense! Making your site about something that you like makes it more fun in the long-run for you to continue managing your site. If something is less like work, then you are more likely to do it. Constant updates on your site is good for traffic and search engines, which generates clicks on your ads. However, don’t create a site about something that is not in demand. Just because you like to study rare deep-sea anglerfish doesn’t mean that everyone else does. If you want to maximize your profits, you will need to give information about something that the general public will be researching.
4)Do not put Google Adsense on a brand new site ! When building a new site, wait until you have completed the site, you have built inbound links, and you are getting traffic. A brand new site can leave your ads being off topic and difficult to follow. Also, if you try to apply to Google Adsense too early when your website is brand new, you will most likely be turned away. Google wants to know that your site has enough traffic so that putting their ads on your page will be profitable to them and you. They don’t waste time on beginner or spammy sites.
5) Do not put images next to your ads! While many people did this for years and it worked successfully, it now against Google’s policies to do so. This is considered to be ‘encouraging clicks’ which is prohibited. If you do so, you may get more clicks for a bit, but you will quickly be caught and banned from having Adsense on your page. And once you are banned, you cannot get your account back into good standing.
Here is a free additional Google Adsense tip: If you haven’t read Google’s Adsense policies, I seriously suggest doing so.
6) Place images in optimal places on your site. Ads that are higher on the site get clicked more often, which generates more income.
7) If you want to maintain optimal profit, do not put your ads on affiliate sites. While well-known affiliate sites may get you more clicks than your own brand new site, you cannot depend on these sites to earn a maximum profit. It can be considered as a violation of the rules and regulations of Adsense. Moreover, each of the affiliate sites charges a percentage of your earnings to be able to post on their site. So, work on your own site, promote it to generate traffic, and be patient. Having ads on your own site will be better for you in the long-run.
8) Make sure to update your site on a regular basis. If you create a site and leave it for a few months, you may find that your traffic has dropped significantly. Therefore, your amount of clicks and pay has dropped as well. No one wants to visit a site that has grown stagnant and has old information, so get busy generating new information for your readers!
9) Create ads that best complement your site. The optimal sizes for ads have been researched. They are the 336×280 large rectangle, the 300×250 medium rectangle, and the 160×600 wide skyscraper. However, don’t simply use these sizes without integrating them into your site well. You want the overall flow of your site to be pleasing to your loyal visitors, so be sure to fit the ads in a way that is visually appealing.
10) Do not stress over the latest google algorithms, or trying to beat the system! Google constantly updates their algorithms to cut out spammers, and this unfortunately messes up the generated income for some sites. However, there is no way to currently beat this system, so do not stress if your site sees a dramatic drop suddenly. Simply continue to work hard at improving your site and keeping up with the latest Google Adsense Tips. Hopefully, you will see improvement again in your traffic.
These are some tips that should help you a great deal when trying to maximize the profits from your ads. Overall, continue working to improve your websites and don’t stress! Everyone knows that Google owns the world in their own mysterious way, and trying to fight it will only end in multiple visits to a psychiatrist. So, be happy and enjoy Google’s business offering to the world!
There are many webpages that you find online that you may find useful for offline. This is very useful especially if you need it for future reference when you are doing research and need the webpages for future reference. You may also need to save it if you have to view the webpage when you don't have internet connection. You don't need any other application apart from Google Chrome, which you might already have or you can easily download from here.
Now follow these simple steps to save the webpage as a PDF.
1. To save the webpage as a PDF file, open the webpage in the Google Chrome browser.
2. Right click anywhere on the page and select print.
3. The following window will appear.
4. Click on 'Change' to change the destination.
5. Change the destination to 'Save as PDF'
6. Click on 'Save' to save it.
7. Choose the destination folder where you want to save the file and save it.
That's all! Now you can easily view it as a PDF document anytime you want.
1. Up in top right corner click the wrench or the customize and control button 2. Click on "About Google Chrome" 3.It will check for updates automatically. Clear your Browsing History, Cookies, and Cache, etc 1. In the top right hand corner click the "Wrench button" or the" customize and control button" 2. Click "Settings" 3.Scroll down and click on the "Show Advanced Settings" button. 4. Under Privacy click on "Clear Browsing Data.." 5. Set it for all time and check every box and clear it all. Re-install your web browser 1.Back Up your Google Chrome Bookmarks (Watch this Video Tutorials) 2. Go to Start-Control Panel-Under Programs click "Uninstall a program" 3. Find Google Chrome in the list and right click on it and click "Uninstall" 4. If you have the setup file then you can install it by running that. 5. If you don't have it then either use another browser such as Firefox or Internet Explorer, and go https://www.google.com/intl/en/chrome/browser/ and download and install Google Chrome again. Uninstall your extensions 1. At the top right hand corner click on the "wrench button" 2. Click on "Settings" 3. On the left hand side click "extensions" 4.Click on the trash can to the right of the extension. Download and install Extensions Go to the Chrome Store to get these extensions to speed up browsing. 1. Click on the wrench and go to "settings" 2. On the left side click on extensions" and at the bottem click on "Get more extensions" 3. Search for Fastest Chrome and Adblock Plus to disable ads on your webpages.
Mozilla Firefox stores your password for forever until you manually remove or uninstall Firefox Just after clicking on 'Remember' button when submitting a 'login form' on any website, Means whenever you do submit a login form on any site such as Gmail, Hubpages etc. Firefox pop up a bar at the top of webpage to ask whether it should, #Remember your password - to fill form entries in future automatically, #Not Now - Mozilla Will show that bar again in future on opening that page another time, #Never for this site - Mozilla will never show again that bar in future on that webpage. Today, Most of the peoples have their own personal computer and do click on 'Remember' button without any knowledge that their password can be viewed by others with these simple steps as mentioned below.
1,Open your browser, 2,Click on Tools in Menu at Top of browser, 3,Click on Options, A new window will open, 4,Click on Security, 5,Click on Saved password (A list of sites will appear with username), 6,Click on Show Passwords and your passwords were now cracked.
Any person that uses your PC or Laptop can easily see your passwords without your knowledge And if you're using Public computers like in cyber cafe's and mistakenly clicked on 'remember' button then persons like me were always ready to crack it (I rarely go to cyber cafe's). So, here are the steps you can follow to secure yourself even after clicking on 'remember' button on your own PC or Laptop. #Do not allow peoples (Exceptions are family Members) to use your PC, Tell them to go cyber cafe as they are for those purposes only, #Set a Master password for Mozilla Firefox itself, Here are steps you need to follow,
1,Go to Tools in Menu Bar, 2,Select Options from the list, 3,Click on Security Button, 4,Click on Checkbox followed by this statement "Use a Master Password". 5,A new window will prompt on screen to enter your password, 6,Click on submit or Okay button, 7,Now, you can go for a walk outside without worrying a little except about those who already knows that you use a same password in most places... Ha Ha.
#Try to avoid habit of clicking 'Remember' button each time as because While writing these article, I seen a list of 40 sites whose password were remembered by my browser... Cool Huh, #Drop your trust on Family in these case, They will kill you for all the activities that you do on Internet.
Enjoy the browsing, Have fun after protecting your Keys.
Most of the bloggers or website owner’s go for Google Adsense because they want to focus on their contents and leave the money making business to be handled by Google. If you are a Google fan, you would have Gmail, Analytics, Feedburner, Webmaster tool etc with you. If you are maintaining these things along with your blog, then maintain the ads from google account itself. That makes the things easier for bloggers.
Internet Techies has provided the reasons behind using Google Adsense for online money making:
a) Very simple to use and integrated with other applications of google
b) Ads are relevant to the site content
c) Google search the dominated and strongest search engine player
d) Once you have a huge content, you will go for custom search of your blog. In that way you opt for Google Adsense because you integrate the Adsense with the custom search to generate the revenue.
e) There are so many examples available where people got the check from google
f) Google is a stable organization and is having a very prosperous future
Other players like Yahoo Publishing Network, Chitika, Amazon et are also good but still the Google Adsense has dominated the sector.
Google’s main revenue source is advertisements appearing on search engine’s result page on computers, mobile devices or tablets. In Google, the advertisers platform to get ads is known as “AdWords” and the publishers platform to publish ads on websites is known as “Adsense”. Here we are talking about making money with Google Adsense and how to create an account to start publishing those ads by Google. I am using Google Adsense since last 2 years and very much satisfied with the program. If you own a website / blog or a blogging network, thinking about trying Google Adsense, then here is the step by step guide to help you do that.
Is this right time to show Google Adsense Ads on Blog?
googleadsense-logo You can enroll for Adsense at any point whether your site is new or old and start serving ads. But I would suggest to serve no ads before getting some popularity. Popularity in terms of PageRank, Monthly Views etc. Start serving advertisements including Adsense ads after getting more than 3,000 view per day i.e. approx 100,000 view per month. Of course if you are getting this much traffic specially from search engine, your site’s PR would be at least 2 or 3. Steps to get Google Adsense Account
Important: Google Adsense team analyzes your submission request, and may or may not approve your account.
Step 1 – First of all, you need a Google Account to sign up for Adsense program. It should be an account with gmail.com ID, which means you can’t get into Google Adsense with custom domain account registered on Google. Here is a process to create Gmail account, you can try this to have a proper Google Account required for Adsense in no time.
Step 2 – Go to Google Adsense page, and provide details about yourself. I would suggest to use Mozilla Firefox for submitting the request in case you are facing any problem on Google Chrome browser. Yes, you can try that with any browser of your choice like Internet Explorer.
Step 3 – As your request has been submitted, now you will have to wait for the approval from Google Adsense team. They will verify the website submitted by you and will also see if you site fulfill the eligibility criterion provided in Google Adsense TOS. For example, you site should have content which are comfortable for read for families and people of different ages. Site should not have any explicit content or anything which may hurt the sentiment of any community of group of people.
Once your request will be approved by Google Adsense team, you will receive an email from them about the approval. Now you can sign in into Adsense page and start creating ads of different sizes and layouts.
Learn more about optimization, better performance, CPC, CTR, CPM about Google Adsense
If you are using WordPress as blogging platform, you may try advertisement manager plugins to rotate ads automatically. You can provide Adsense ads into those plugins to rotate between Adsense and direct ads (or any other ad from different network).
Social networking now plays a major role in getting traffic to a blog and it all becomes better when your readers can easily share or bookmark your blog posts on their favourite social network. This post explains how to add large share buttons to your blog posts. This includes facebook, twitter, digg, delicious and the whole rest of them.
1. Log in to your blogger account, click on design, then edit html. 2. Always remember to back up your template so you can restore it in case something goes wrong. 3. Click on Expand widget template 4. Press CTRL + F and search for this code:
If you’re using a magazine style template or have more than one of this code in your template, locate the one that actually contains the post body on blog post pages. If you’re confused about the right one to use, search for this code instead:
6. Save your template.
Now check any of your blog template and you can now see the large share buttons with facebook, twitter, digg, delicious, reddit, technorati, linkedin, mixx and stumbleupon.
Bidvertiser is an online advertising and publishing network that allows the owners of websites or blogs to make money with their visitors. Now a days Bidvertiser is the best alternative advertising program of Google Adsense. I think that Bidvertiser is the second best way to make money online. Because this is the company that really pays well. The most interesting fact is … you don’t need to wait for Bidvertiser account approval. You can Create your Bidvertiser publisher account any time and create ads. Then put those ads to your website. That’s it. Bidvertiser offers a free sign up. You don’t need to pay for a account.Monetize your Website or Blog with BidVertiser How does Bidvertiser work?
Bidvertiser displays highest bidders ads to assuring you the best payment for your website. You will see the improvement of your Bidvertiser bidding. They will help you by giving you a simple point and click tool for your ad customization. You will be able to see your websites ad performance, impressions, clicks, click-through rates and the total amount you have earned.
Bidvertiser Advertising Program
There are four different ways to make money through Bidvertiser.com . - By Pay Per Click (PPC) - By conversions (Commisions) - By referrals - Bidvertiser Toolbar
Pay Per Click: PPC is the most popular ad program in Bidvertiser. You will be paid for each valid click from your visitors.
Convertions Earning: This is an excellent giving from the Bidvertiser company. This is an extra income for Bidvertiser publisher. Bidvertiser will pay you for your natural quality visitors you send to them. If your site refers a number of high value leads this will increase your Convertion Bonus. Most of the time the Convertion Bonus is large amount than PPC earnings.
Referral Program:It is another most charming factor in Bidvertiser. There are two types of referral bonus given by Bidvertiser. 1.When a user signs as an advertiser and first spends $10, you will be credited $5. When the same advertiser spend $50 then your account will be credited with $20.
2.When a user signs as a publisher and first earns$10, Bidvertiser will credit your account with $10. When the same publisher earns $50, you will be credited with $40.
Bidvertiser Toolbar:
This Toolbar can also make you a lot of money. You have to use this toolbar in your website. When any visitor search through this toolbar your account will be credited.
Bidvertiser Ad Formats
Bidvertiser supports 4 groups of ads. They are Bannar Ads: Sizes of this type ads are …
Full Banner (468 X 60)
Leaderboard (728 X 90)
Skyscrapers: There are 3 types of Ads …
Wide Skyscraper (160 X 600)
Skyscraper (120 X 600)
Half Page Ad (300 X 600)
Rectangles: 2 Types of ads are given …
Medium Rectangle (300 X 250)
Large Rectangle (336 X 280)
Mobile Ad: This is the singly type …
Mobile Banner (300 X 50)
How much does Bidvertiser pay per click?
Actually there is no exact rate is fixed by Bidvertiser. They pays per click according to the bidding rate. As I used bidvertiser before, I got $1 highest and the lowest is $0.03 . The payment for per click also depends on your traffic quality.
What are the payment methods for Bidvertiser?
There are two different payment methods given by Bidvertiser. – By Check: The minimum payout for Bidvertiser through Check in $100. – By Paypal: The minimum payout for Bidvertiser through Paypal is $10 Bidvertiser gives you payment once a month. If your revenue is not sufficiant for payout in a month. Then the amount will be added to your account for the next payment date.